
Creating a Prop with only 2 textures
- Adam Hayward
- Jul 18, 2024
- 5 min read
Updated: Aug 4, 2024
Wait, what??
No, you're not going mad. You really did read that title right. I had to make a prop from a single reference image, the only catch was that I could only use 2 textures on the model. Frankly that restriction didn't bother me much. What itched was the fact all of the reference images used 3 or 4 materials in order to look a certain way.
Some of the more eagle-eyed viewers among you may have noticed that the model I'm talking about had 3 textures when I published it on my portfolio. There are 2 versions. The one I submitted for evaluation and the one I'm relatively happy with.
NURBS
After evaluating my options, I chose to model a glass vial. This meant that I could spend more time getting used to the NURBS format.
For those that aren't familiar, I am definitely not the best person to ask what NURBS are, but ultimately what I did was draw half of the bottle from a 2D perspective and use a tool to spiral it round and create a cylindrical shape. This is where my Photoshop skills paid off, as I found it very similar to creating and manipulating vertices using the pen tool.
Once I was happy with it, I converted the shape to a poly primitive and welded the bottom of the vial together to finish modelling that part of my.... Health potion? Stamina boost? Magical essence? I honestly don't know what to call it, lets put it to a vote.
I wouldn't drink that if I were you
The glass vial image I was using had a cork in the top and a yellow liquid inside. So after a very short vote from my peers (that I don't really remember asking for), I was now making a urine sample. They weren't entirely wrong, it did look a bit like that up until I gave the liquid a bright yellow glowing property. But I'm getting ahead of myself.
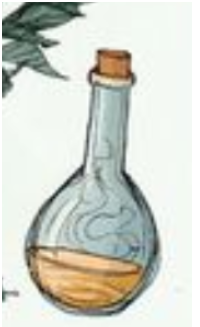
The above image is the reference image I had to go by. Frankly I found it really weird that there are fumes coming off the liquid in the vial, with my current modelling skills I didn't see this happening, so I figured I'd do something else to make the potion seem safe and drinkable.
The tricky bit
Making the liquid, I decided to duplicate the vial and delete all the faces except an inner semi-circle, I flipped the faces around so the model was texturing the outside instead of the inside of the model. Then I capped it off to create a top to my liquid layer. The reason I used the vial instead of trying to hash it together using a sphere, is that it would have the exact form and vertex count. Or in simple terms it would fit like a glove, which helps me as liquids don't tend to leave air pockets.
In hindsight, I now know this isn't the best way to make a liquid. Please keep in mind that at the time of making this model I was still in the first year of my Foundation Degree and had no idea how to apply physics to an object to get a more realistic appearance. That said, if you have an easy method to get an effective result, please write in the comments below.
I was a bit lazy when it came to making the cork, I chose to take a cylinder and pinch one end to create a conical shape. Then I bevelled the edges to round the edges of the cork.
UV maps
I'm not going to say too much on UVs. This next bit isn't my strongest skill, it can take me a little while to work out where the seams need to be, but I can create usable UV maps now without totally screwing things up for myself. In this case, the shapes were fairly simple so I was able to break them down without too much hassle.
The reason I broke down the UVs manually was because I needed to display that I could separate UVs and export them to use in Adobe Substance Painter. Besides, it's always good practice a skill that you aren't comfortable with. There's only one way you're going to get better at it.
Texturing
Yes, it's time to add a splash of colour to this model. I had to remind myself not to get carried away as I only need the 2 materials. Is it self control if I make the 3rd anyway?
Probably not, but here we are.
Before I started, I referred back to the reference image. Seeing that I needed both materials to be transparent.
So after baking the model (twice, I may have forgotten that I needed an opacity map), I started with the see-through glass bottle. I added a Smart Material called Glass Visor, changing it's metallic and roughness properties allowed me to get a clean reflection from the material. I set the opacity to 0.2 I believe, and then I went back and changed the glass Base colour to an orange, which I thought would add to the liquid's glowing property.
I'm jumping ahead a little there, but if you look at the reference image, the vial has a smoke effect coming from the liquid. Now I had no idea how to make something like that in Maya or Substance Painter. So I swapped the effect for something I knew I could do, make it glow. In my mind, it was still a potion and I was really trying to steer people away from the thought that I was making a urine sample bottle. I figured that potions can have different appearances and I had an opportunity here to make my first health / mana / stamina potion. Besides, if I'm being marked on how this model turns out, using my initiative and showcasing another skill could prove to be the right move (which it was). The opacity value for the liquid was set to 0.6 to allow for a clear difference between the liquid and glass materials.
Now, with 2 textures made. I had to create a material for the cork. As I'm sure you guessed, my glass material from earlier became the material I used to get grades.

Making the cork for the model that is included in my portfolio was actually a little fun. I'd been working on textures that required a bit more technical understanding than I had at the time. Plenty of iterations, going back and forth until I could clearly see that there was a liquid with a glowing property and not just a coloured glass layer, noting whether the faces were clipping or if there were texture issues. So going back to a solid, non-reflective surface that I was familiar with was refreshing and a felt like a little reward for the steps I took out of my comfort zone.
I got to work with how tight the cork scraps were going to be to eachother, the difference in colour, any scratches or damage on the cork, if there was a pattern on top.

I thought about the fact the bottle is holding in a liquid, and how the cork is very unlikely to be dry. I mean, a vial with a round bottom isn't likely to be found in a perfect upright position each time. The top of the cork is going to remain dry, but the cork inside the bottle is probably damp and therefore a darker colour.

Thanks for reading this far, I know I'm one of these people that writes and doesn't really stop.
As I said before, this model can be found on my portfolio under the 3D Assets section, my ArtStation and Sketchfab pages.


Comments